In this article, Change the network of windows 11, we focus on introducing the specifics of the networks we know, how to change those networks through the settings menu as we want, and how to solve the problems that arise there. This article is especially relevant for Windows 11 users. This is very simple. You will find that the steps presented for each scenario are the same. But make the relevant changes very carefully.
What are the Network Profile Types?
In Windows 11, you may configure various network profile types with particular settings to strengthen the security or share files, printers, and other network resources. There are three different types of network profiles. Let’s see what are they.
Public Network profile
If you are sharing resources in the places such as workplaces, public places, and homes the public network is the most suitable. When you are using the Public network profile your device will be invisible in the local network. Normally new connections are allocated to this network profile. It prevents other networked devices from finding your PC. A public network is regarded as dangerous if it is shared with a third party without proper protection. Therefore, Windows 11 is using some restrictive Firewall rules to prevent file sharing, network discovery, media casting, and automatic printer setups.

It means Windows will turn off discovery features by default the moment your device connects to a public network as you don’t want other users to be able to view your files and other data while your device is linked to a public network. Other networked devices won’t see your computer and it won’t look for them. Windows utilizes various network settings because it thinks that public networks are full of devices that you don’t want to connect to.
However, other users who attempt to access it might require a password if a computer linked to the local network has enabled network discovery. Therefore, the moment your computer joins a new network, it will ask you if you want to utilize the Public or Private network profile.
Private network profile
For trusted networks like your home or place of employment, the Private profile is designed. Sharing of your files and folders is permitted and there are fewer restrictions. Additionally, it makes your PC visible to other networked computers. You may set this profile for the linked network if you trust it. The computer can be located thanks to this profile. You may share files, printers, and other resources with individuals you trust thanks to this profile.

Usually, Windows 11’s network discovery features are enabled on the private network. It implies that you will be able to see other networked devices more easily, and those devices will also find yours. The private network profile makes it simple to share files and utilize other networked capabilities. For example, access to the Public folder on one machine is simple and doesn’t require a password or any additional restrictions. So, as a result, sharing media files is much easier. If you have full access to the network, such as your home or office network, you should choose the Private network profile. Both LAN and Wi-Fi connections are acceptable for this.
Domain Network Profile
When your PC joins an Active Directory and you log in to a domain controller, the domain network automatically applies. All computers can access the Private and Public, but they cannot access the Domain unless they have joined the domain.
Change the network profile from public to private for both wireless and wired connections
01) Change Network from Public to Private in Windows 11 PC – (Wireless Connection)
The first time you connected to a wireless (Wi-Fi) network, you might have selected to utilize the Public profile, which blocks all network discovery features. Thankfully, Windows lets you switch a profile from public to private accordingly. In this part, we’ll assume that when you’re connected to a wireless network (Wi-Fi), you’ve decided to.
Follow these steps :
- To open the settings menu, right-click on the Windows symbol in the taskbar.

- Click Settings to access the Settings app.

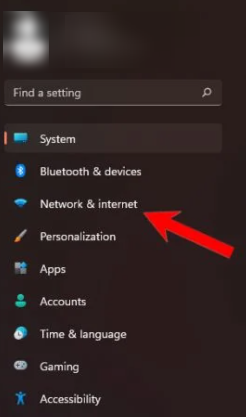
- Click on Network & Internet in the left pane.
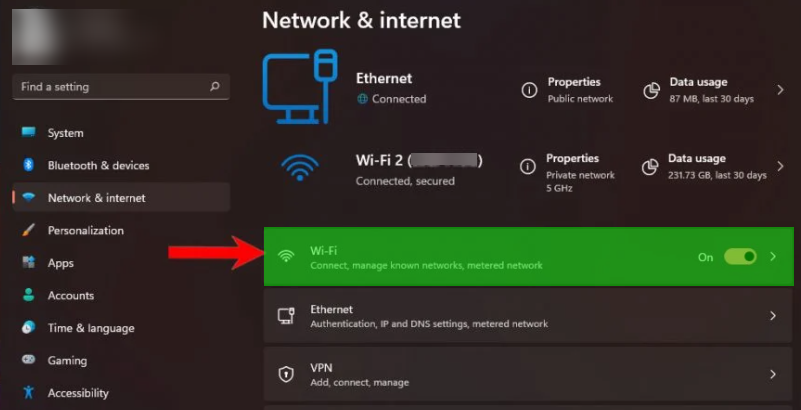
- In the right pane, select Wi-Fi.
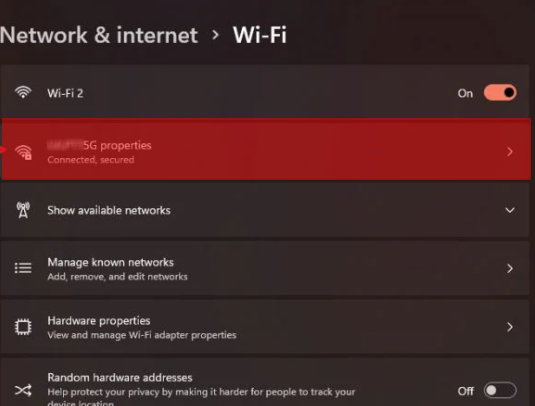
- Click on the Wi-Fi network to which you are now connecting.
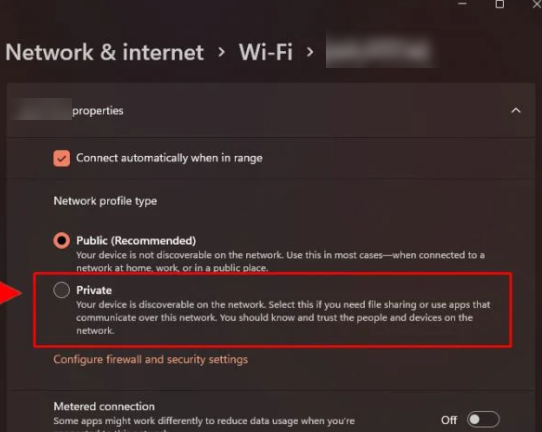
- Select Private under Network profile type and then the Wi-Fi network profile will be changed from public to private immediately.
02) Change Network from Private to Public in Windows 11 PC – (Wireless Connection)
Follow these steps :
- To open the settings menu, right-click on the Windows symbol in the taskbar.
- Click Settings to access the Settings app.
- Click on Network & Internet in the left pane.
- In the right pane, select Wi-Fi.
- Click on the Wi-Fi network to which you are now connecting.
- Select Public under Network profile type.
03) Change an Ethernet Connection Public to Private (Wired Connection)
Follow these steps :
1: To open the settings menu, right-click on the Windows symbol in the taskbar.

2: Find the Settings app and click its icon to launch it.

3: Find and click on Network & Internet in the left pane.

4: On the right pane, click Ethernet.
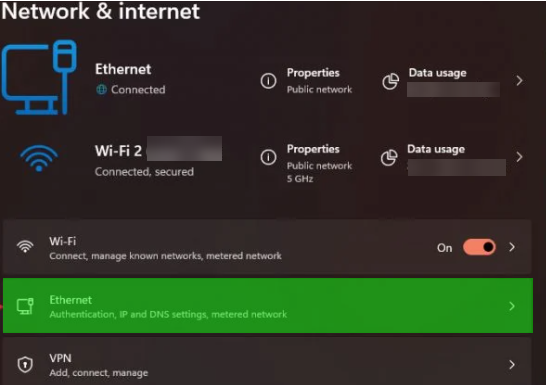
5: Click Private under the Network profile type to choose it.
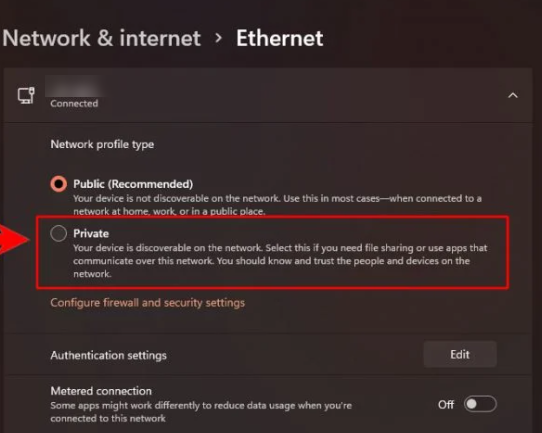
Once adjusted, you can use all network discovery features. Also, file and printer sharing are both enabled.
When going from a public to a private network, or conversely, there are no internet settings that need to be changed on the network adapter. Your WiFi network connection is also affected by the same phenomenon.
Set firewall settings for your network
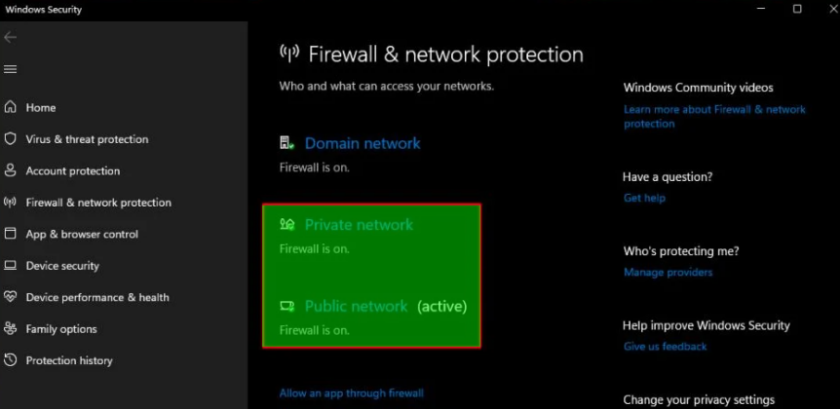
Making sure both network profiles are firewalled, especially if you have sensitive files and data, is another technique to stop attacks on your computer. So, if you need, you can disable the firewall for your network like this.
- Go to your network connection
- Click Configure Firewall
- Click Security Settings
- Then Change the firewall settings as you want
Advanced Network Settings
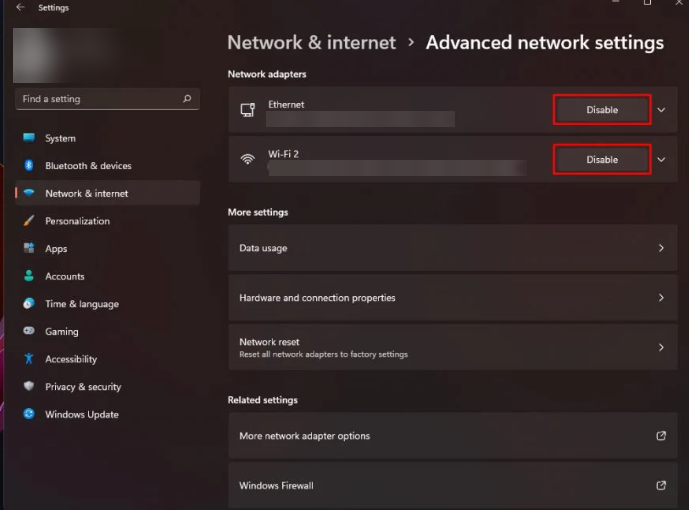
You can disable your computer’s network adapters, keep track of how much data your programs are using, check your Hardware and connection information, and reset your network under the Advanced network settings option. How to access it is as follows:
01) To open the settings menu, right-click on the Windows symbol in the taskbar.

02) To launch the Settings app, look for and select Settings.

03) Click on Network & Internet

04) Click Advanced network setting option.
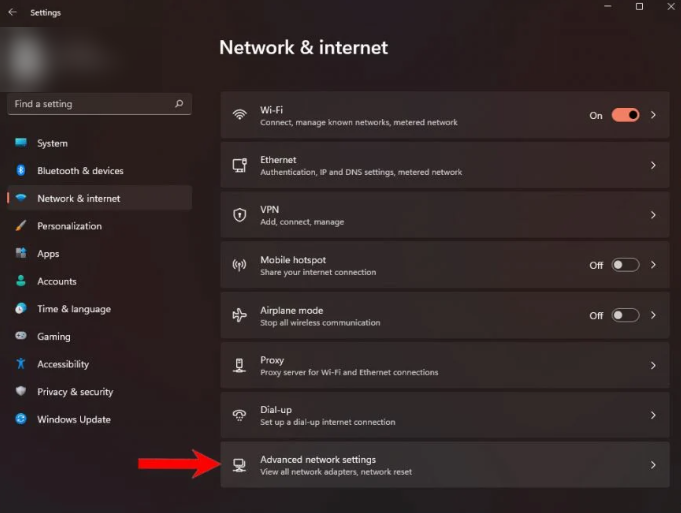
05) By selecting the Disable option under the Network Adapters section, you can turn off any of your connections.
Fixing Network-Related Problems with Network reset.
If you’ve revised any Windows settings, such as your Internet settings, but are still having trouble connecting to the network, don’t panic; Windows now lets you restore all network settings to their factory values. The same process can be used if your computer is having trouble with browsing or with a different wireless network connection, such as Bluetooth.
What you should do to resolve network issues is as follows:
01) To open the settings menu, right-click on the Windows symbol in the taskbar.

02) To launch the Settings app, look for and select Settings.

03) Click on Network & Internet

04) Click Advanced network setting option.

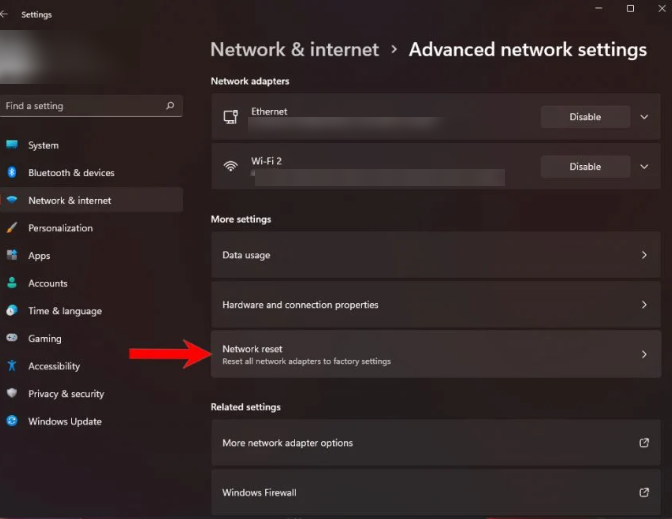
05) Select Reset Network.
06) To continue, use the Reset now button.
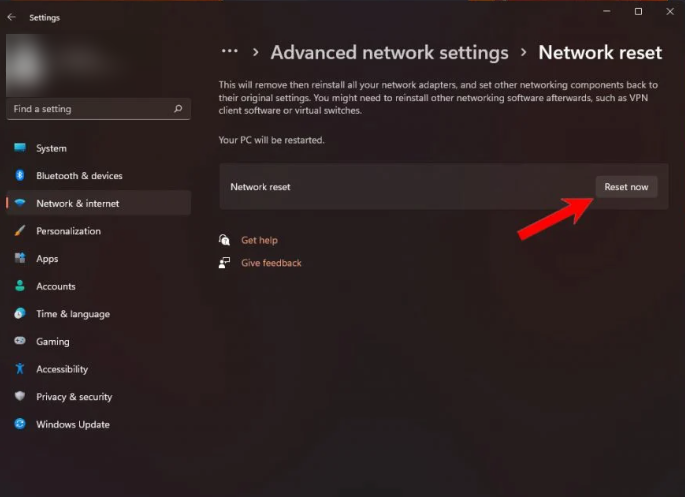
Restarting your computer will allow the memory to be refreshed when the network reset is complete.
When the machine boots up, some Windows settings and every network configuration are reset to their default defaults.
IMPORTANT TIPS :
It’s advised to begin your troubleshooting with basic remedies when experiencing internet connection issues. Then you can then continue to more advanced improvements as necessary.
- Before concluding that your internet connection is problematic, make that your wired or wireless network hardware is turned on and connected. Also, view multiple websites as opposed to just one.
- Check for firewall issues on your PC.
- Verify that you are in the wireless signal’s range.
- Check the settings for your wireless network.
- Check for issues with your broadband router or access point.
- If you believe your account has been blocked, get in touch with your ISP.
- Look for software bugs.
- To check if your internet is down, call your internet service provider.
So, that’s it. We think that this article might be of some assistance to you.
FAQ :
Why Am I Unable to Join any Network?
Because there are numerous potential failure points, wireless networks are complicated. Finding the location of the network failure can be challenging because it might be anything from the Wi-Fi switch to a software conflict, router issue, or ISP issue. Misconfigured settings and physical separation from the network source are the most frequent causes of Windows failing to connect to a network. There are, however, a number of additional potential reasons: The network is overloaded, Wi-Fi is off, a piece of software has disrupted the connection, the network requires unique authentication, or the connection has been lost.
Which type of internet connection is quicker, Ethernet or Wi-Fi?
A wired Ethernet connection is more reliable than a wireless one when choosing between Wi-Fi and Ethernet. Signal interference is not a concern while using Ethernet.
