
Introduction to Zoom Crashing on Windows 11
Zoom crashing on Windows 11 is a common problem. If Zoom keeps crashing on Windows 11 computers, read this article till the end as this article discusses the reasons and the solutions. Zoom crashing on Windows 11 often occurs during screen sharing in online classes or while conducting an online meeting. This situation can occur due to some errors in Windows 11 installation and application setting errors in the Zoom application. The purpose of this troubleshooting guide is to identify those errors and eliminate them correctly.
First, let’s identify the common errors responsible for these problems.
- Errors – not updating the Zoom app, camera drivers, and Windows 11 System.
- Errors – incorrect application settings.
- Errors – corrupt system files.
If you are using an older version of the Zoom app, it may not be compatible with Windows 11. On the other hand, running an outdated version of Windows with an updated Zoom app can also cause problems.
And when using faulty and outdated camera drivers they start to malfunction. So, if you have not updated the camera drivers, it will start causing problems while using the camera.
If the application setting is wrong, it will crash. As a result, Zoom may not function properly. Also corrupt or damaged Windows system files lead to various problems. It causes random crashes when using the Zoom app.
So these are the errors affecting Zoom Crashing on Windows 11.
Next, we will look at the possible solutions to these problems and the methods to be followed.

01) Restart the Zoom Application & Windows 11 System
Force Stop & Re-Open the Zoom Application & Windows 11 System can be indicated as a quick solution when a problem occurs. This resolves internal errors in systems and applications.
Follow the steps below to close the application and restart your computer.
- To open the Task Manager window, press Shift + Ctrl + Esc keys
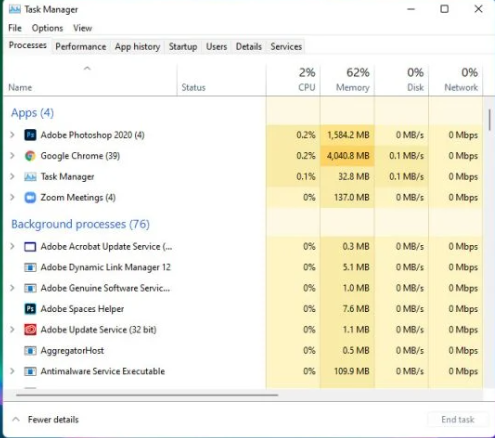
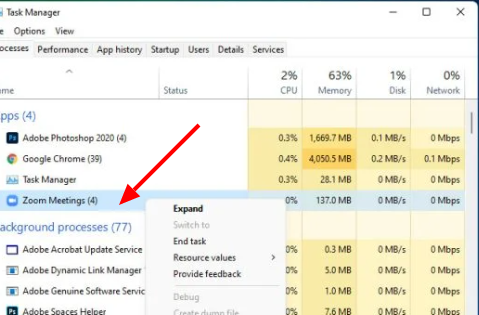
- Right Click on Zoom Meetings
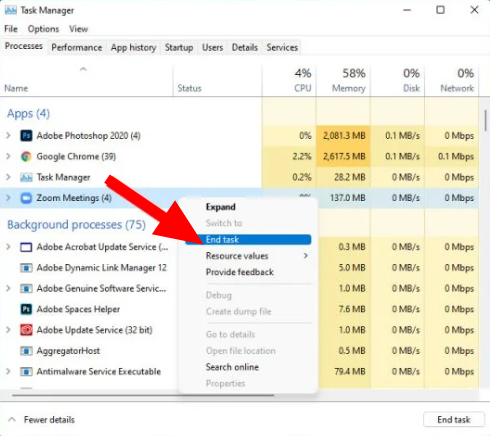
- Click on End Task
- Go to the Start menu and click on the Windows icon
- Select the Shut Down or Sign Out option
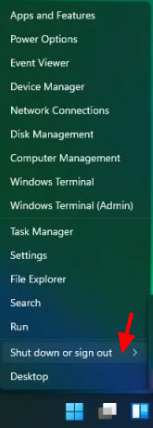
- Select the Restart option
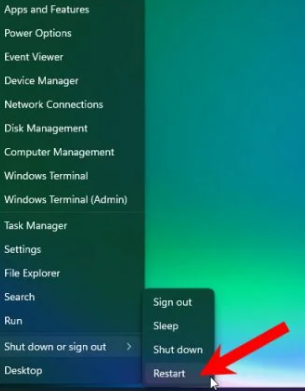
Launch Zoom again and check it out
02) Update the camera driver
Follow the steps below to update the camera driver.
- Press Windows key + R
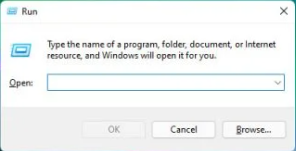
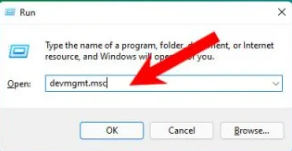
- Next, type “devmgmt.msc” in the box field and click OK
- In the Device Manager window, double click on the camera
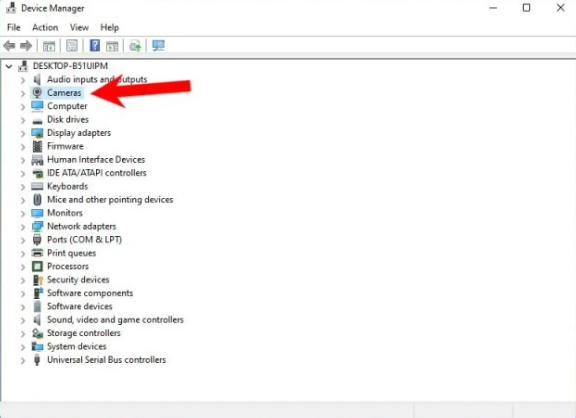
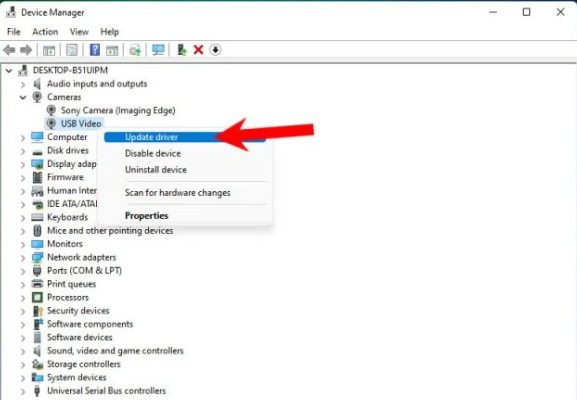
- Right-click the camera of your computer and click Update Driver
- Click “Search for drivers automatically“
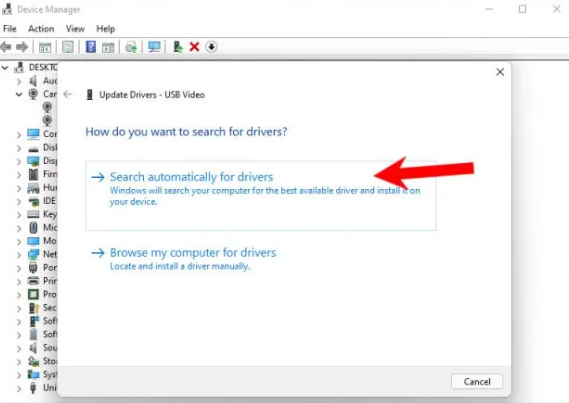
- Allow your computer to update the drivers for your camera
- Launch Zoom again and check errors
Important:
Pay special attention to whether your headset, microphone and audio devices including speakers are working properly. If you have updated your computer’s camera drivers but the problem started after that, you should have to roll back the driver.
Follow the below steps to roll back the driver.
- Press Windows key + R.
- In the field that opens next, type “devmgmt.msc”.
- Click ok
- Double-click on the camera in the device manager window
- Right-click on camera and click Properties
- Click the Driver tab
- Click Roll Back Driver and wait for it to finish
03) Change Zoom Application settings
Follow the below steps to Change Zoom Application settings
- Launch Zoom.
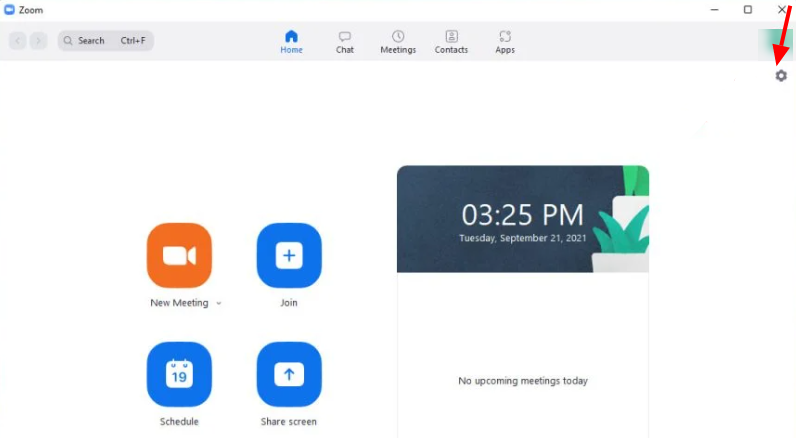
- Click the gear icon (see top right corner)
- Select the Video tab. Click on Advanced
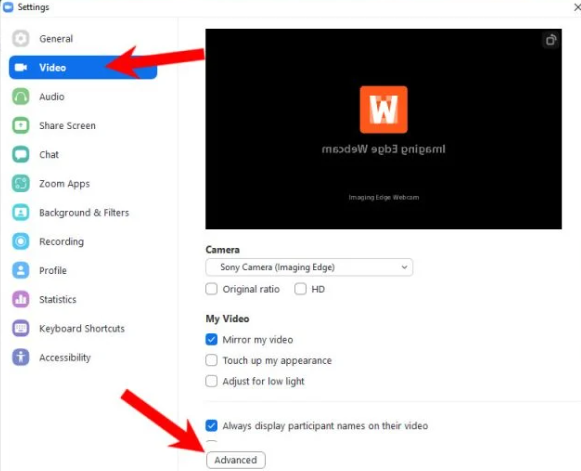
- Under the Video Rendering Method section, select Direct3D11 from the drop-down menu.
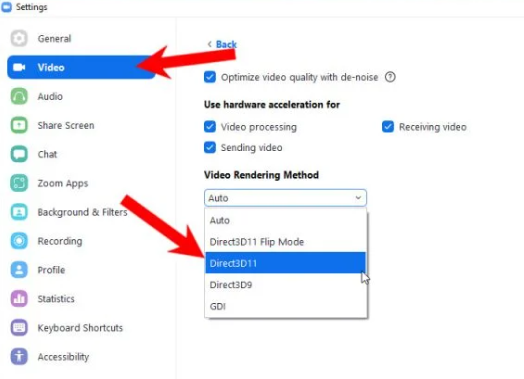
Restart the Zoom desktop client.
When the reboot is complete, try doing a zoom meeting using the attached or integrated camera. The default configuration of the application varies from computer to computer. Those configurations are often enough to make your zoom meeting smooth and seamless, but there are times when you’ll have to change some settings.
04) Uninstall and Reinstall the Zoom Application & Update Windows 11 System
Like any other zoom apps, there are times when you need to uninstall the problematic one and reinstall it. Uninstalling an app will delete all potentially corrupt caches and installation files, and reinstalling it will ensure you’re using the latest version.
Follow the steps below for Uninstall and Reinstall the Zoom Application :
- Press the Windows key, find the Settings icon and click on it.
- In the left pane, find and click Apps.
- In the right pane, click Apps and Features and wait for the list of apps to load.
- Find Zoom and click on the More icon to the right (three dots stacked vertically).
- Click Uninstall. Wait until the application is successfully uninstalled.
- Open a web browser and type Zoom.us/download in the address bar.
- Select the correct version for your Windows 11 PC and download it.
- Once the download is complete, run the installer to reinstall Zoom.
Follow the steps below for update windows 11 system
- Right-click on Start icon
- Click on Settings option
- Click on the Windows Update option
- Then click on the Check for updates option (Windows will search and download updates if available)
- After the process, restart your computer and launch the Zoom application
- Check if the issue is resolved or not
05) Run Zoom on the dedicated graphics card
Follow the steps below for Run Zoom on the dedicated graphics card
- Right-click an empty space on the desktop
- Click Nvidia Control Panel
- Select Manage 3D Settings
- Click Program Settings and click Add button below
- Select Zoom Meetings and click Add Selected Program
- Select the preferred graphics processor for this program
- Select the high-performance NVIDIA processor
- Click Apply to save the changes
- Relaunch the zoom client and try to use it
Dedicated Graphics It greatly enhances the app’s video rendering and processing. You can try using other features like screen sharing, schedules and other things to see if it still crashes or not.
06) Repairing the Corrupted System Files
Repair damaged Windows system files using the built-in System File Checker tool. This is an advanced tool. It scans and repairs corrupted system files to run SFC scan.
Follow the steps to repair corrupted system files:
- Press Windows key + R.
- Type “cmd” in the Run box and press Enter
- Now run the command prompt as administrator
- Then in the command prompt type sfc/scannow and press Enter
- Wait for the scanning process to complete
After the process reboot your system and launch the zoom app again to see if the problem is resolved.
Any of the points mentioned above will surely solve your problem. So, thanks for reading.
Frequently Ask Questions :
Do I need a webcam to connect to Zoom?
It is not essential. Without a camera, you can’t transmit your videos. But you’ll be able to listen and speak, share your screen, and view other participants’ views.
How do I participate in Zoom Meetings?
Clicking on the meeting link. By going to join.zoom.us and entering the meeting ID.
What is the requirement to set up a Zoom account?
If you’re creating your meetings, you’ll need an account. But if you are just a participant in Zoom Meetings, an account is not necessary.
Does Zoom charge?
No. Zoom is free for basic needs.
You may like to read: